Abstract: This article explores various ways of programmatically applying drop shadows to text and images drawn on the Tablet PC. Programs are written in C#. Familiarity with .NET Windows Forms programming is required. Familiarity with at least some basic concepts of the Tablet PC is helpful. Recompiling and running the programs requires Microsoft Visual Studio 2003 and Tablet PC Software Development Kit 1.7.
Perhaps the most common way of giving a short text string a little oomph is the drop shadow. The drop shadow is also one of the simplest text techniques for the programmer: Just draw the text twice in two different colors, with the shadow generally a bit below and to the right of the foreground text.
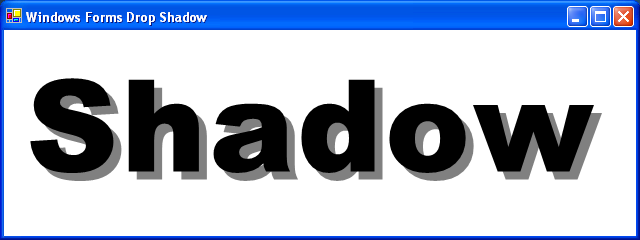
The WinFormsDropShadow program demonstrates how particularly easy this job is in a Windows Forms application:
Although everything in this program is hard coded — including the 96-point font size and the 6-point shadow offset —it’s easy to imagine generalizing the color of the shadow, or basing the shadow color on the background color. The offset of the shadow from the text can also be generalized.
But applying drop shadow to boring old Windows fonts is not what this article is all about. The Tablet PC lets users write text on the screen in a freeform style, with their own unique unrepeatable fonts — every one as different as a snowflake. As I began experimenting with Tablet PC programming, I soon became obsessed with applying drop shadows to the text I drew with the stylus. If this job were as easy as it first seemed, I probably wouldn’t have become quite so obsessed with it…
The easiest way for a Windows Forms program to take advantage of stylus input on a Tablet PC is through an InkOverlay class. You simply create an InkOverlay object, associate it with a control (the client area of your form will do in a pinch), enable it, and you’re off:
InkOverlay inkov = new InkOverlay(ctrl);
inkov.Enabled = true;
Thereafter, any writing or drawing you do with the stylus on the ctrl control is rendered on the screen and collected by the InkOverlay object in the form of an Ink object.
Ink is the primary data medium for the Tablet PC. Basically, an Ink object is a collection of Stroke objects. A single Stroke object is created whenever the user puts the stylus to the screen, moves it, and lifts it. A Stroke object basically is a collection of coordinate points relative to the upper-left corner of the control, probably with pressure information and perhaps some other data (depending on the tablet hardware). In graphical terms, a Stroke is a polyline and Ink is a collection of disconnected polylines.
The Ink class contains a property named Strokes (notice the plural) that is an object of type Strokes (another plural). Strokes is a .NET collection class that exposes all the individual Stroke objects. An object of type Strokes can be indexed just like an array to obtain the individual Stroke objects. For example, if you had a particular Ink object named ink, then
ink.Strokes.Count
is the number of Stroke objects that comprise the Ink object, and
ink.Strokes[5]
is the sixth stroke.
It is indicated in the documentation of the Strokes property that when a program obtains a Strokes object from an Ink object, it is obtaining a copy of the actual Strokes collection. All the Stroke objects in that collection are the actual Stroke objects, but the collection itself is a copy. This has several ramifications:
First, if your program obtains a Strokes collection, you can rest assured that it won’t change, even if the user is actively still drawing new strokes on the control.
Second, you cannot add a new stroke to an Ink object by adding it to the Strokes collection. The Ink object has special methods (for example, CreateStroke) to add a stroke to an Ink object.
Third, you cannot delete a new stroke from an Ink object by deleting it from the Strokes collection. Once, again, the Ink object has special methods (for example, DeleteStroke) to delete a stroke from the Ink collection.
Fourth, if your program obtains a Strokes collection, and then calls CreateStroke and DeleteStroke on the Ink object, the Strokes collection you obtained does not change.
This characteristic of the Strokes property may seem restrictive but it will actually help us.
There’s a very important rule when drawing drop shadows, and that is:
The shadow must not appear in the foreground.
Yes, it’s obvious, but when dealing with multiple strokes, getting the shadows firmly in the background is the central problem.
The first approach I’ll show is a program that mostly lets the user just write and draw ink normally. The user then selects a menu item to apply drop shadow to the accumulated ink. The program won't simply just draw the shadows — it will add new strokes to the ink that represent the shadows.
Let's suppose the Ink object contains four strokes: 1, 2, 3, and 4. This is the order that the user drew the strokes, and also the order in which InkOverlay will redraw these strokes when the control needs repainting. This ordering may not be always apparent but it makes a difference when the strokes are different colors.
If drop shadows are to be added to this Ink object, the Strokes collection must be altered. It must contain shadows for strokes 1, 2, 3, and 4, and the foreground images for strokes 1, 2, 3, and 4, in that order.
Probably the most straightforward way to accomplish this feat is to call CreateStroke four times to add shadows to the Ink object, then call CreateStroke four more times to add foreground images to the Ink object, and then call DeleteStroke four times to delete the original strokes from Ink object.
The The InkDropShadow program demonstrates this technique. After you draw or write something on the screen, select the Shadow menu item. The program adds drop shadows to all the strokes:
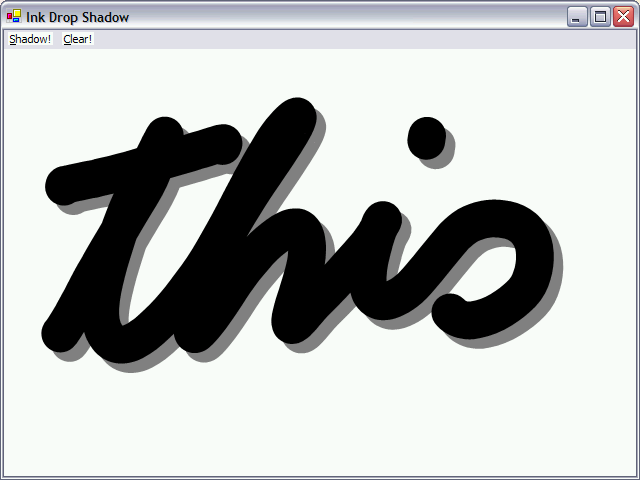
The program creates a window with two top-level menu items that don’t invoke drop-downs: The Shadow option adds a shadow to the ink already drawn; the Clear item clears the ink from the surface of the window.
The form’s constructor concludes by creating an InkOverlay object attached to the form:
inkov = new InkOverlay(this);
inkov.DefaultDrawingAttributes.Width = 1000;
inkov.DefaultDrawingAttributes.IgnorePressure = true;
inkov.Enabled = true;
InkOverlay has a DefaultDrawingAttributes property that lets the program (or the user) set color, pen width, and some others. They are called default drawing attributes because they apply to all future strokes that become part of the Ink object. It’s also possible for each stroke to have its own drawing attributes.
The coordinate system used throughout the Tablet PC class library is in units of hundredths of millimeters, equivalent to the MM_HIMETRIC mapping mode of the Win32 API. Thus, a Width property of 1000 is really a centimeter. Drop shadows are best for text with wide strokes, and a centimeter qualifies.
I’ve also set the IgnorePressure property to false. Normally the InkOverlay will vary the width of the line a bit based on the stylus pressure. This varying line wide would be very difficult to imitate in a drop shadow, so it’s best just to turn it off.
All the code for adding the drop shadows is in the Click event handler for the Shadow menu item. The handler first obtains the Ink object from the InkOverlay object and the Strokes collection from the Ink object:
Ink ink = inkov.Ink;
Strokes stks = ink.Strokes;
Remember: This stks object will remain stable throughout the event handler.
For each stroke in the collection the program must make new Stroke objects for the shadows and add these to Ink object. The CreateStroke method of Ink both creates a Stroke object (based on a Point array) and adds it to the Ink. Each stroke has its own DrawingAttributes property, which is an object of type DrawingAttributes. This new Stroke is given the same drawing attributes as the existing stroke, but with a gray color. The Move method is a transform that offsets all coordinates of the stroke, in this case 250 units (a quarter of a centimeter):
foreach (Stroke stk in stks)
{
Stroke stkShadow = ink.CreateStroke(stk.GetPoints());
stkShadow.DrawingAttributes = stk.DrawingAttributes.Clone();
stkShadow.DrawingAttributes.Color = Color.Gray;
stkShadow.Move(250, 250);
}
The event handler then also makes new strokes for the foreground images:
foreach (Stroke stk in stks)
{
Stroke stkText = ink.CreateStroke(stk.GetPoints());
stkText.DrawingAttributes = stk.DrawingAttributes.Clone();
}
The existing strokes can then be removed from the Ink object:
foreach (Stroke stk in stks)
ink.DeleteStroke(stk);
So, each stroke in the original strokes collection is replaced by a shadow and essentially a copy of the stroke, but now all in the right order.
The program has some flaws, of course. You can click the Shadow menu item multiple times and add shadows to the shadows. A more-sophisticated program might want to keep track how many strokes have already been shadowized.
Is it possible for a program to add drop shadows without awaiting a command from the user? The process can be automated by adding a drop shadow for each stroke right after the stroke is completed. A program that uses an InkOverlay can be informed of the completion of each stroke by installing a handler for the Stroke event.
However, the approach I used in the InkDropShadow program shown above no longer appealed to me. As each additional stroke is added to the ink, the program is dealing with a larger strokes collection that it must rearrange by largely recreating. Another solution was demanded — perhaps an approach that involves the way the shadow is drawn and doesn’t require messing with the strokes collection.
The solution wasn’t immediately apparent to me because I’ve been doing Windows Forms programming for several years now, and consequently there are certain things I don't automatically think about any more. Although I’ve grown quite fond of the graphics system in the System.Drawing.* namespaces, I have learned to live without certain features in the Win32 API that didn’t make it into Windows Forms.
Such as raster operations, for example. Remember raster operations?
Take a look at the DrawingAttributes class that InkOverlay uses to draw strokes. Although the Color property is defined as a Windows Forms Color object, it is obvious that the InkOverlay is not using Windows Forms graphics system to render strokes on the screen. It is obvious because one of the properties is named RasterOperation, and you set this property to a member of the RasterOperation enumeration. The sixteen members of this enumeration correspond to the sixteen R2_ constants of the Win32 API used in conjunction with the SetROP2 and GetROP2 functions. GDI uses this raster operation when drawing lines. (The number '2' in these identifiers and functions indicates that the effect of a particular raster operation is based on two things: the color of the pen and the color of the destination. A larger collection of 256 raster operations is available for drawing bitmaps; these are combinations of the source, destination, and the current pattern set in the device context. See my book Programming Windows, fifth edition, pages 166-168, 657-659 for details.)
The trick here is to draw the shadow using a raster operation that doesn’t affect the foreground text. The shadow can then be drawn over the foreground text and still appear as if it's in the background. To simplify the analysis, let’s assume we have a 4-bit gray-shade system. Black is 0000, White is 1111, and Gray is 1000. Let’s assume the background is white, the text is drawn in black, and you use a gray pen to draw the shadow.
When drawing the gray shadow pen on the white background, you want to result to be gray:
| Background: | 1111 |
| Shadow Pen: | 1000 |
| Result: | 1000 |
When drawing the gray shadow pen on the black text, you want the result to be black:
| Text Color: | 0000 |
| Shadow Pen: | 1000 |
| Result: | 0000 |
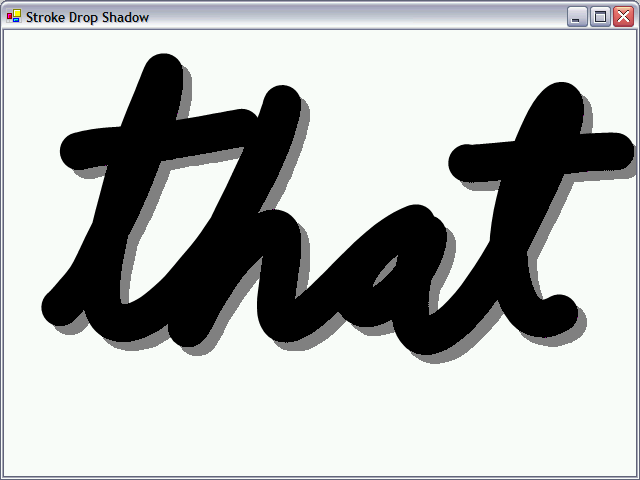
The pen should draw a 1 bit only when both the destination and source are 1. That’s the raster operation known in the Win32 API as R2_MASKPEN and in the Tablet PC class library as RasterOperation.MaskPen.
The StrokeDropShadow program shows how it’s done:
The Stroke event handler begins by obtaining the just-completed Stroke object and the Ink object associated with that stroke:
Stroke stk = args.Stroke;
Ink ink = stk.Ink;
Now a new shadow stroke can be added to the ink. Nothing has to be deleted or rearranged because the raster operation prevents the shadow from appearing on top of foreground text:
Stroke stkShadow = ink.CreateStroke(stk.GetPoints());
stkShadow.DrawingAttributes = stk.DrawingAttributes.Clone();
stkShadow.DrawingAttributes.Color = Color.Gray;
stkShadow.DrawingAttributes.RasterOperation = RasterOperation.MaskPen;
stkShadow.Move(250, 250);
Drawing a shadow after the completion of each stroke was certainly coming closer to the effect I wanted, but it didn't quite make it. The next step — applying the shadow in real time as the strokes are drawn — is a big one. It requires abandoning the cozy comfort of the InkOverlay and switching to using the Real-Time Stylus.
When using the Real-Time Stylus, a program is delivered the equivalent of MouseMove events. These are called “packets” because they contain not only coordinate information but also stylus pressure and potentially other data.
A program that uses the Real-Time Stylus is entirely responsible for rendering the lines on the screen, and for retaining the packets data. (In the examples that follow, I have ignored this latter job and focused solely on rendering.)
To use the Real-Time Stylus, a program creates an object of type RealTimeStylus and bases it on a control or the client area of a form:
RealTimeStylus rts = new RealTimeStylus(ctrl);
rts.SyncPluginCollection.Add(spi);
rts.Enabled = true;
The second line of code here shows an object that I've named spi being added to the SyncPluginCollection of the RealTimeStylus object. This object must be created based on a class that you define that implements the IStylusSyncPlugin interface. In other words, this class must contain fifteen methods and one property defined in the interface. Fortunately, most of these methods can have empty bodies. The most significant of these methods are StylusDown, Packets (basically a “stylus move” method), and StylusUp. These methods in your class are called as the user is drawing with the stylus.
A program generally saves the initial stylus point during the call to StylusDown, and then draws tiny segments of the stroke in the Packets method. The coordinates points passed to these methods are in units of hundredths of a millimeter, and it’s probably best to convert them to pixels before doing any drawing. The Packets method may find that two consecutive points when converted to pixels are the same, and thus doesn’t have to draw anything during that call.
Those tiny line segments drawn in the Packets method turn out best when they are given rounded ends. (That is, set the StartCap and EndCap properties of the Pen object to LineCapRound.)
The RealTimeDropShadow0 program shows the naïve approach to drawing a real-time drop shadow. Even though the Packets method draws the shadow segment first and then the foreground segment, there was no question that this wouldn’t work right. But I was curious just to see how bad it would look. The results are even odder than I anticipated. Segments of the shadow often draw over segments of the foreground, causing a jagged appearance:
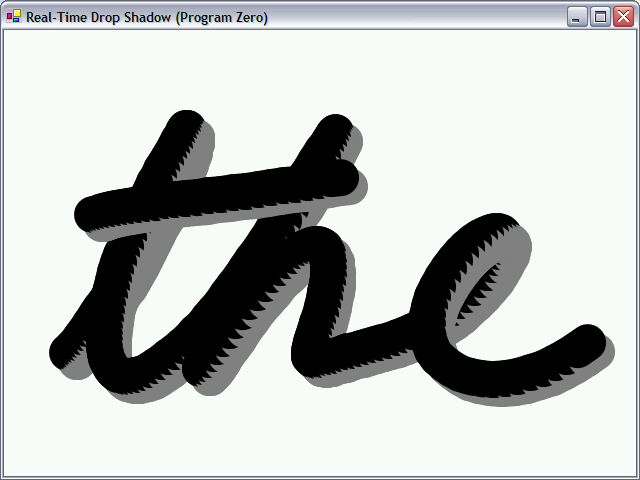
(This program has two source code files: RealTimeDropShadow0.cs has the class that derives from Form. StylusSyncPlugin0.cs has the class that implements the IStylusSyncPlugin interface and where all the action takes places. This naming convention will continue with the final two programs in this article.)
So why didn’t I just start off by using a raster operation in the Packets method? Because when you’re implementing a Real-Time Stylus in a Windows Forms program, you’re not using the DrawingAttributes class any more. You’re drawing with Windows Forms Pen objects, and you can’t do raster operations.
Of course, there’s a way to do raster operations in Windows Forms, and that’s by taking advantage of PInvoke, the facility available to provide managed programs with interoperability to Win32 functions. To do this, you declare the functions you need with the dynamic link library in which the function resides.
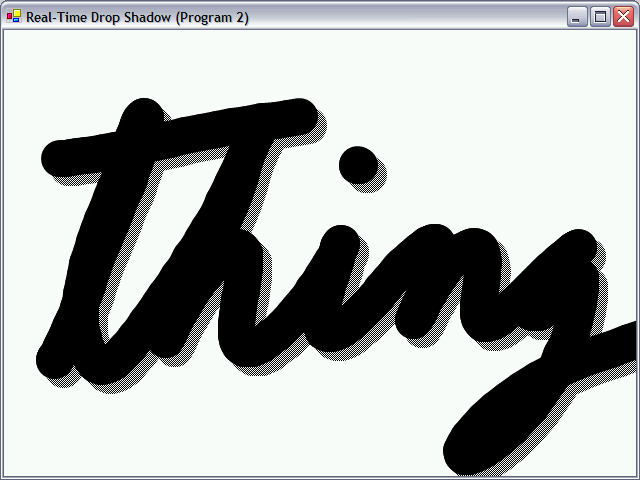
The RealTimeDropShadow1 program requires six Win32 functions to draw a shadow using a raster operation: CreatePen, SelectObject, DeleteObject, SetROP2, MoveToEx, and LineTo. If you’ve been away from Win32 programming for any extended period of time, just the mere mention of these functions is probably enough to give your the willies.
Here’s the program in action:
The StylusPlugin1 class creates a gray Win32 pen in the StylusDown method:
hpen = CreatePen(0, iWidth, 0x00808080);
The Packets method draws the foreground segment using a Windows Forms pen, and then obtains a Win32 device context handle from the Graphics object. The gray pen is selected into the DC and the raster operation is set:
IntPtr hdc = grfx.GetHdc();
IntPtr hpenOld = SelectObject(hdc, hpen);
SetROP2(hdc, (int) Microsoft.Ink.RasterOperation.MaskPen);
We’re now ready to draw the segment of the shadow and restore the DC back to normal before releasing the handle:
MoveToEx(hdc, ptStylus1.X + iOffset, ptStylus1.Y + iOffset, IntPtr.Zero);
LineTo(hdc, ptStylus2.X + iOffset, ptStylus2.Y + iOffset);
SelectObject(hdc, hpenOld);
grfx.ReleaseHdc(hdc);
The Win32 pen is deleted in the StylusUp method.
It worked, but I didn’t feel good about it. Whenever I have to resort to Win32 interoperability in my Windows Forms programs, I’m plagued with guilt. I do understand, obviously, that it's not really my fault that I have to call Win32 functions. I realize I’m only compensating for something that somebody else has left out of Windows Forms. But still I’m nagged by the thought that maybe, maybe, there’s a way to do it using WinForms and nothing but WinForms.
And there is.
When you’re working with Windows Forms pens, you may not have raster operations available, but you do have some other nice features.
A WinForms pen, for example, can be based on a brush.
A brush, in turn, can be based on a bitmap.
And a bitmap can have transparent pixels.
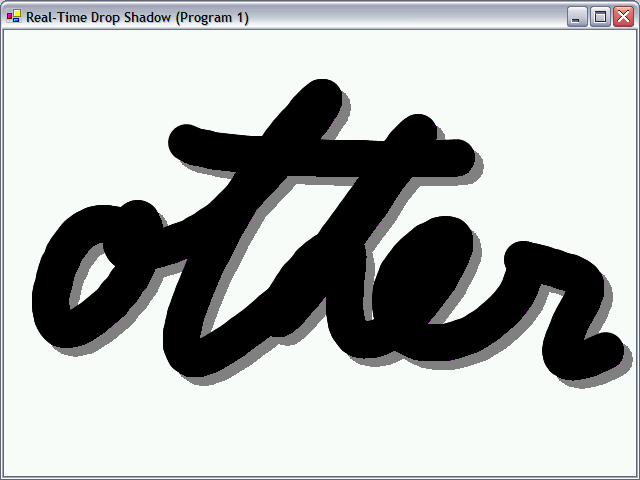
The RealTimeDropShadow2 program uses these simple facts to implement a shadow pen based on a 2 bit-by-2 bit bitmap. Half the pixels are the color of the pen; the other half are transparent. The result looks a little different that the previous programs but the drop-shadow effect is definitely there:
An early version of this program created the bitmap, brush, and pen anew in each Packets method. That proved to have intolerable performance. I moved all that code to StylusDown:
Bitmap bm = new Bitmap(2, 2, grfx);
bm.SetPixel(1, 0, clr);
bm.SetPixel(0, 1, clr);
TextureBrush tbrsh = new TextureBrush(bm);
pnShadow = new Pen(tbrsh, iWidth);
pnShadow.StartCap = pnShadow.EndCap = LineCap.Round;
The clr object is the foreground pen color, defined as a field of the StylusPlugin2 class. You can change it to a different color, and the shadow will be based on that color. In the Packets method, the program draws the foreground with a normal pen, and the shadow with this partially transparent pen.
Yes, sometimes there really is an alternative to Win32 interoperability.
After posting this article, I received an email dated March 24, 2005 from Shawn Van Ness of Microsoft indicating that I seem to have misssed the DynamicRenderer class. This class implements the IStylusSyncPlugin interface and displays stylus strokes based on a DrawingAttributes object. Drop-shadow can be displayed by this plug-in by chaining it along with two instances of a plug-in that performs translation. Shawn's code is here:
Shawn also tackled the question of how to color the shadow. He wrote: "unless we can assume the foreground pen color is all-black, we need to craft a color for the shadow that's MaskPen-compatible with it — that is, only bits turned on, no bits turned off. I didn't spend too much time thinking about it, just coded up the easiest approach that occurred to me: I turn on the highest order bit I can find, in each R, G, B component."
© 2005, Charles Petzold (www.charlespetzold.com)
First Posted: March 2005
Back to the Et cetera page.
Back to Home