Simple Cable Simulation
November 18, 2008
New York, N.Y.
When I met up with Jeff Prosise last month at the Microsoft Professional Developers Conference — we were both doing six-hour "pre-con" tutorials next door to each other; mine was on WPF while his was on Silverlight — we talked a little about the Enigma simulator he was writing and which I discussed yesterday. At that time he still hadn't decided how to do the cables for the plug board. While he went ahead with one solution, I kept thinking about it.
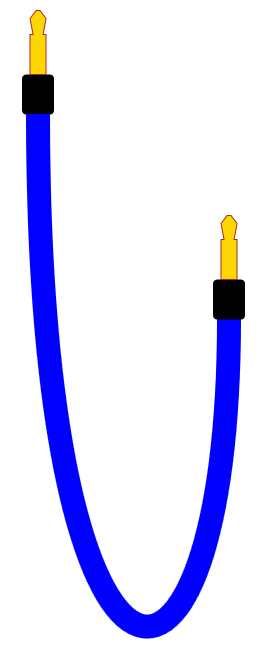
I thought it might be fun to have an actual cable hanging down the screen where you could grab either of the two plugs with the mouse and move them around. The interaction is simplified considerably if you keep the plugs pointed in a uniform direction and don't allow rotation.
I decided on a simple curve for the cable: a single Bézier spline with end points at the two plugs. Each of the two control points has the same X coordinate as the corresponding end point, and the two Y coordinates are equal to each other. In other words, if the end points are (X1, Y1) and (X2, Y2), then the two control points are (X1, Y3) and (X2, Y3).
Another constraint helps keep the cable fairly straight at the point where it enters the plug: The Y coordinate of the control points is never allowed to be less than a fixed number of units greater than the Y coordinates of the end points. In the code, this is the constant MAX_CONTROL_POINT_Y_OFFSET, which I set to 100. Using the terminology shown above,
-
Y3 >= Max(Y1, Y2) + MAX_CONTROL_POINT_Y_OFFSET
If you want to make this fairly realistic, the really major constraint is keeping the length of the cable constant. The easiest way to calculate the length of a Bézier spline is to approximate it with a polyline — this is called "flattening" the curve and is easily accomplished by calling the GetFlattenedPathGeometry method of Geometry — and then sum up the lengths of the individual lines.
So here's the logic: When the user depresses the left mouse button over one of the plugs, the mouse is captured, On a MouseMove event, a new control point Y coordinate must be determined. It has a lower bound given by the formula above. The upper bound is ... well, it wasn't quite clear to me, but I just summed the two Y coordinates of the end points and added the cable length (determined at startup).
Then it's a matter of trial and error: repeatedly calculating the cable length using control point Y coordinates set to the lower and upper bounds, and comparing those with the fixed cable length, and setting a new lower bound or upper bound for the next iteration. If the constaints do not allow the new position of the plug, then the mouse event is simply ignored.
Here's the Visual Studio project with the WPF version of the code:
-
CableExperiment-WPF.zip
For a WPF programmer like myself, converting a program from WPF to Silverlight is a constant reminder exactly how many apparently esoteric and "unnecessary" classes and methods one uses. The first big shock was discovering the absence in Silverlight of GetFlattenedPathGeometry, so I had to add my own Bézier flattening logic. A binding in the XAML file no longer worked, and there's apparently no GeometryDrawing class in Silverlight, so I had to rethink the plug-drawing logic.
Silverlight also doesn't have a Vector structure, which I've apparently come to rely upon for some simple tasks. For example, when calculating the length of a line, I've become accustomed to using:
-
(pt1 - pt2).Length
The difference between those two points is a Vector, and Length is a property of that structure. I've also become accustomed to using implicitly created vectors when adding a difference between two points to a third point:
-
pt1 + (pt2 - pt3)
All this simple logic had to be replaced with wordier code. The performance of the resultant Silverlight version was terrible (and I'm not sure how much of that was a result of using my Bézier-flattening logic rather than WPF's) until I severely altered the flattening tolerance. The source code is here:
-
CableExperiment-Silverlight.zip
Most of these files are generated by Visual Studio. The only files that contain my code are Page.xaml and Page.xaml.cs.
You can run the Silverlight version here:
-
CableExperiment.html
Once a program is in the business of using its own path-flattening logic, it might as well just incorporate a custom curve rather than using the Bézier. Theoretically, a hanging cable takes on the form of a catenary, which allows the programmer to use the otherwise rare hyperbolic cosine function (Math.Cosh). But that's for another day.
Also for another day is adding some gradient shading to the drooping cable. In WPF 3D, that happens automatically. In 2D, however, it's not quite obvious how it would be done.